Showing posts with label shabby. Show all posts

1.4.12

Welcome...


So I'm kinda lovin' the versatility of quilting and embroidery hoops. They can be used to hold your favorite fabric for some effortless and inexpensive wall art, as frames for family pictures.....even as little bulletin boards.

Lately, I've used the bigger quilting hoops as frames to showcase old tarnished silverware like this and I absolutely love how they turn out but today I wanted to make something to hang on the front door that wasn't necessarily seasonal and so could be used throughout the year. Plus, I had a hoop that I'd already distressed just waiting for me to put something in it.

I got out my stamps and paint and made a few rolled fabric flowers from scraps of linen, dupioni silk and canvas drop cloth and I couldn't be happier with the way it turned out!


Really simple materials that completely work together and I love the richness of the silk mixed with the rustic look and feel of the burlap. Could be flush against a wall or door or hung from a ribbon and I think it would make a terrific housewarming gift!




3.1.12

New Year...New Projects...New Possibilities...


It seems like the older I get, the faster the years go by. I think it's because I pretty much hit the ground running each morning and before I know it, the day is done, it's time for bed and on to the next day. So it's no surprise that, kitchen calendar notwithstanding, the new year is upon me and I'm faced with looking ahead at new projects and new possibilities.

First things first, I've updated the look of my blog ~ it was time for a change and one of the things I really want to do this year is open an online store so this was kind of in preparation for that and I'm thinking of changing the name of my blog which is driving me crazy because it has to be just right you know?

I'm excited though! Excited about working on all the projects swirling around in my head, about finally listening to ~ and doing something about ~ the many dear family and friends who've encouraged me to sell my work. Excited about making a space for myself and discovering more about Annalea this year; of letting go...letting in...going deeper. And sometimes, for me, it's easier to do that when I've got a new little pretty to wear.

Hello jewelry and fabric stash. Hello Pinterest inspiration. Hello new necklace!


I had the chain, the fabric, the burlap (don't toss those scraps yet) and the cool button. I actually stitched the chain to the back of the fabric flower which I sandwiched together by sewing the button on first. Each circle is two layers with the one on top being slightly smaller than the one underneath. The last circle was put on with fabri-tac after I attached the chain to hide the stitches and give it a clean look. A toggle clasp in the back finishes it off.


Love love love it! Quick to make, pretty to look at and the perfect "just because" gift for a friend.


13.12.11

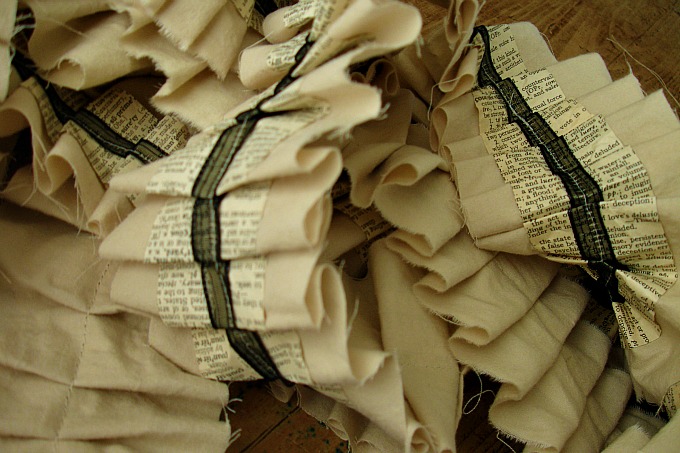
Dictionary Page Garland


I've kind of been on a roll lately making ornaments for our tree which I'm glad about because I was having a bit of a dry season the last couple of months. Enter my wonderful old dictionary with pages and pages (literally) of availability for every idea I've had. I don't even think I've gone through 3/4 of it yet because it's so huge! Couple that with the repeated raiding of my linen closet and tearing up sheets, quilts and pillow cases for my crafting pleasure. I tell you what...nothing releases tension like ripping up fabric! Except maybe breaking dishes. I'll have to try that sometime.

I wanted to make a garland for our tree (which I don't actually have just yet) and I wanted it to be lonnnnggg because I hate that when I buy it, it mostly comes in 6 ft increments then there's always a gap or I always run out because I didn't buy enough. This year my decorations are cream and silver and vintage-y so off to the linen closet I went and found an old, dark cream, twin-sized sheet that I promptly started ripping up into 3-inch wide strips then started tearing pages out of my dictionary and cutting those into 1/5-inch wide strips that I crumpled up before I flattened them out (I like the look plus it makes them softer and more malleable).


I put a strip of hot glue halfway down one side then halfway down the opposite side then laid it down the center of my fabric strip (note: if there are images on one side of your page and you don't want them to show, just make sure that this is the side you put the glue on).


I wanted something on top that would pop so decided on some thin, shear black ribbon.


Originally thought of making a ruffle but ended up pleating as I went along; much easier imho.


I just kept going and stopped at 19.8 feet. Our tree will be about 6 feet and I want the garland to be generous. I have enough supplies left over to go longer if I need to.


It turned out pretty and I'm looking forward to seeing it on the tree with my other ornaments and lots of white lights! This would also be pretty as ribbon for a gift wrapped in brown kraft paper. Ahhhhh.....


Have you ever made a garland for your Christmas tree? What materials did you use?


4.5.11

French Market Bag


Since I've never been to France I can't really claim that this is the kind of bag the French actually use when they do their marketing but the saying on the outside is in French so there it is.

If your not familiar with the Graphics Fairy yet, you really out to head on over - she's got over 2,000 free images to download and if you're a fan of all things vintage/victorian you're bound to find something you'll love to use on a project.

I got inspired to make this bag from this tutorial over at Creative Cain Cabin. It's fairly simple and while not completely detailed you shouldn't have any trouble following along, even if you're new to the sewing arena. The inside fabric was from an old duvet that I had and the outside was in the upholstery section of Fabric Barn (only $3.50/yd!) so this cost me about $4 to make.

I'm still toying with the idea of adding a blanket stitch to the top hem.... what d'ya think?


Love it though. It would make a great hostess or housewarming gift but I think this will stay with me. Can't wait to take it to the Farmer's Market this Sunday. Yeah!

28.4.11

Elegant Pedestal


I'm always amazed at what can be found through thrifting and then turned into something one might find in a fancy boutique either to purchase or as part of a display. Pedestal serving pieces are some of my favorites; they're not only easy to make ~ they can be done inexpensively and are completely customizable like this one I made a while back.

I got inspired by this post over at The Speckled Dog and really liked the wood pieces as a medium. Aren't they sweet?


So, a few weeks ago I was browsing at my local Salvation Army specifically looking for wood pieces and came across this tarnished silver candle stick and wooden plate. 30% off of everything too so these two pieces just cost me $3.20!


So, not my original plan but I really liked the idea of putting silver and wood together; kinda Colonial America.


Not that I'm versed in Colonial American decor or anything but when I put it together I wasn't as WOWED as I thought I'd be so, as any self-respecting crafter would do, I got out my paints and glue and sanding blocks and set to work.


First a creamy yellow all around. Then a creamy white. Then sanding (Hey - don't knock the emery board. It worked great. Very coarse and bendy) and gluing.


I brushed on and lightly wiped off some metallic silver paint and then put on a coat of satin interior varnish.


I like it much better this way. I have some pine cones that I'm going to do up with silver paint for Christmas (I know, I know. Just thinking ahead) but you could do just about anything with it. I went back to the S.A. last week to see if they had any more candlesticks and wooden plates and, of course, they were out. But I'm still on the look out cause I love the way it turned out and definitely want to make several more!


Makes a great gift for your friends who like things with a shabby and vintage feel! Oooo...or to hold candles or pearls or shells or dainty cookies dusted with powdered sugar.

Don't get me started!

Pin It


25.4.11

A bit of lace and fabric to adorn my wrist


I've no idea what hit me yesterday but I came down with a cold hard and fast. Aches, fever, chills...the whole shebang! Needless to say I spent most of the day in bed convalescing with lots of hot tea, pain relievers and my favorite heating pad. By noon I was bored and restless and started in on one of my favorite past times...surfing craft blogs (what else?) and got inspired to make a cuff bracelet.

I don't really have a tutorial for you but if you go to Vintiquities Workshop you'll see one along with my inspiration. Once you get going on these, it's hard to stop cause you can just keep adding and layering and embellishing to your hearts content.


I used fabrics I had on hand which included a cloth napkin, gauze lining and, of all things, a cloth diaper! Craze, I know, but it's sturdy and super soft! I added some beads and pieces of a doily and blanket stitched all around the edges. I love it. It probably looks a little bridal but since my husband often refers to me as his beautiful bride....I suppose that's okay. It's definitely girly and feminine and makes me feel a bit like Marie Antoinette. She would have totally been down with this.


7.7.10

I'm SO Making This!


So I just saw this adorable idea at Style Me Pretty while surfing around this morning. Isn't it adorable?!? I've seen these mugs at Anthropologie ~ I even have a couple of them ~ but never thought to use them for anything but a beverage.

Just love the shabby vintage look of it all and I know at least a dozen gals that would adore this as a gift - I know I would!

A little idea to make note of when you want to give something to bring out a sweet smile in a friend.
Related Posts with Thumbnails